
One day, my friend and I were planning to start our own venture. We both come from DIY backgrounds, so we wanted to do something craft-related. We started doing a lot of research and finally came across Cricut machines. Since then, we have been running a successful small business providing custom T-shirts to our beloved customers. Today, it has been 5 years, and we are doing really well in our venture.
Also, we are using Cricut EasyPress 2 in our T-shirt designing business. With my expertise, I now want to help all future craft enthusiasts to start their craft journey. So, if you are looking for an easy guide on how to use Cricut EasyPress 2, then you are in the right place! In this guide, I will share step-by-step instructions for using EasyPress 2 as an example.
What Can You Do With Cricut EasyPress 2?
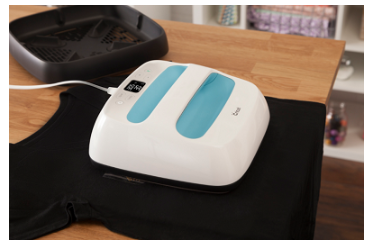
There are endless possibilities with your Cricut EasyPress 2. For example, you can transfer the design on any fabric such as T-shirts, Tote bags, etc. The device is used to apply iron-on vinyl materials onto your clothes within 60 seconds. Also, it heats up to 400° F and distributes heat evenly to the surface.
The incredible feature of Cricut EasyPress is that it can shut off automatically when you are not using it. Moreover, Cricut EasyPress is available in three different sizes for different sizes as per their demand. However, I have a larger EasyPress, which measures 12 x 10 inches. Now, let’s learn how to use Cricut EasyPress 2 with a suitable example.
How to Make First Project on Cricut Easypress 2?
Here, I am going to show you how you can make your first project on Cricut EasyPress. However, in this example, I will show you how to apply the intricate design on a customer’s T-shirt. Try the following simple instructions to get started with your Cricut EasyPress 2:
Step 1: Create Your Design
In order to learn how to use Cricut EasyPress 2, first of all, you have to get ready with your design. Decide what design you want to apply to your clothes. Follow the steps carefully to prepare your design:
- First, upload a premade design from Cricut Design Space or create your own.
- Place the vinyl material on the mat and load it into your Cricut cutting machine.
- Once your design is cut, weed it using the weeding tool.
Step 2: Adjust Cricut EasyPress 2 Settings
Now, we have to do some settings before using Cricut EasyPress 2. Let’s follow the steps below to set the timer and temperature.
- First, you should use the Cricut Heat app to determine the settings for your projects.
- Then, hit the timer and set the recommended settings by using the +/- buttons.
- Now, press the temperature and set the recommended temperature for your project by using the same +/- buttons.
- The orange lights on your heat press indicate that your EasyPress is heating up. Greenlight means it has reached the recommended temperature.
- Lastly, beep sounds tell that it is ready to go.
Step 3: Preheat the Blank Material
Before applying the vinyl on a T-shirt, I will first preheat my base materials. Preheating the materials makes the surface evenly flat, leaving no crease on clothes or fabrics. So, preheat the fabric up to the recommended time settings.
Step 4: Place Your Design on a Blank T-shirt
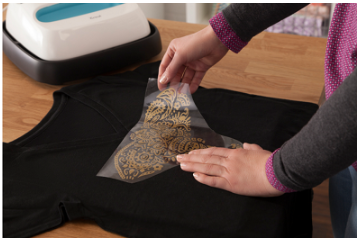
Now, it is time to place the material on a T-shirt that we cut with the Cricut machine. Ensure the shiny surface of the vinyl is facing upward.
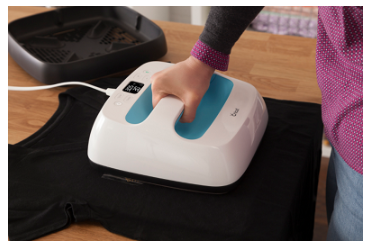
Step 5: Apply the Heat to Your T-shirt
- After placing the design on your T-shirt, take your EasyPress and place it over the base material (T-shirt).
- Then, hit the Go button to start the recommended timer.
- Now, you have to hold the EasyPress 2 for a while and apply the required pressure.
- After applying the heat and pressure, you have to refer to the Cricut EasyPress 2 Heat Guide to check the peel temperature instructions. Do not miss this step before peeling the carrier sheet.
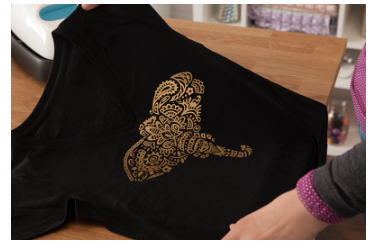
- Finally, our new T-shirt is ready to use, and now you have understood how to use Cricut EasyPress 2.
FAQs
Question 1: Do I need a heat mat to use a Cricut EasyPress 2?
Answer: Using a Cricut EasyPress mat provides a suitable environment when transferring iron on fabrics. Also, it keeps the surface evenly flat so that we can apply the pressure without any problem. But, a heat mat is not a compulsory accessory to use. Hence, you should use a thick towel as your heat mat.
Question 2: Why is the Cricut EasyPress a better choice than a household iron?
Answer: Since Cricut EasyPress is a hybrid version of a heat press and an iron, it has the speed of a heat press and provides the convenience of an iron. On top of that, there are different time, pressure, and temperature settings for different types of materials, and we get all such settings in the EasyPress machine. Hence, Cricut EasyPress is a better option over household iron.
Question 3: How can I use Cricut EasyPress 2 on my shirt?
Answer: Follow each step carefully to use a Cricut EasyPress 2 on a shirt:
- Place your shirt on the EasyPress Mat.
- Now, you should preheat the shirt for five seconds.
- Then, place the cut design on your T-shirt.
- Next, put EasyPress on the top of your design.
- Hit the Cricut button to begin the countdown.
- Here, apply the pressure gently until the timer stops.
- For better results, you should repeat the same process from the other side.
- Finally, peel the design and enjoy your new shirt.
Conclusion
I understand that the first project can be a little intimidating, but with this simple guide, you can easily learn how to use Cricut EasyPress 2. Every project is unique and requires a next level of creativity. However, creating a first project using a Cricut EasyPress requires you to have a Cricut cutting machine as well. In short, I have explained the possibilities with Cricut EasyPress 2. Furthermore, I shared the simple steps to apply vinyl designs on T-shirts.